We wanted a fire pit on our property for family and guests to gather around during their visits to the farm. The fire pit would also become a focal point for farm events, where people can sip hot chocolate and roast marshmallows, tell funny stories and make memories.
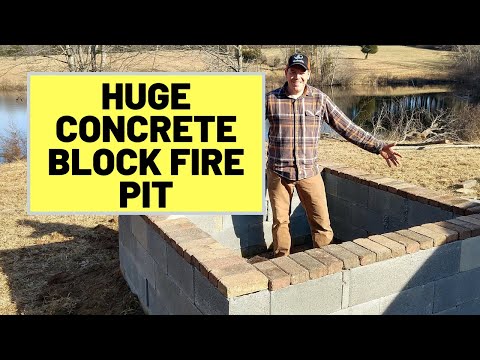
Our fire pit is about 6.5 feet square and is over 24inches tall. There’s a bit of slope where we have the fir pit installed, so it’s 24 inches tall on the uphill side, and about 30 inches tall on the downhill side.
I weighed the decision about how tall to make it for some time. Safety was the primary concern as I knew we would routinely have small children gather there, and I wanted to minimize the risk of anyone falling in the fire.
The only drawback to this height is that it also blocks heat from radiating towards those who may be sitting around it. Guests have to stand close to fire pit to feel the heat on the upper half of their bodies.
The steps we took to create the fire pit are summarized as follows:
- Measure the area for the project and remove vegetation and top soil
- Excavate additional soil as necessary to ensure the area is level
- Create a solid foundation using sand and gravel
- Tamp the gravel base and double check for level
- Install the first course of solid block and check for square and level.
- Using landscape adhesive between blocks, set additional courses of blocks to the desired height (we did 3 courses high)
- Cap the walls with solid block or bricks to add a finished look
Here’s the full build video when we put down the foundation and assembled the whole fire pit in just a few hours.
A few points to note about landscape adhesive. First, the packaging makes no mention about how this product holds up to heat. I have used it previously, and it has proven durable in my experience. Second, landscape adhesive does not install well when its cold outside. If its not at least 55 degrees, you may want to consider another method of adhesion or use mortar.
We later found out that our fire pit did not drain well. We used paver base as a foundation instead of more gravel, and it simply did not drain as well as we would have liked. We later had to dig out sections of the base and install metal pipe to allow water to drain after heavy rains. If I had to do it again, I would have 4-6 inch gravel base without the sand or paver base to ensure good drainage.
To finish up the project, we did some excavation around the fire pit area to make it more level. This time, the excavation was done with the tractor (we didn’t have this tractor when we started the project and did the initial site prep by hand).
As of the publishing of this post, which is about a year after we installed the fire pit, I can say the pit is holding up great. We’ve had some monster fires in this thing, and we’ve been able to dispose of a lot of sticks and brush since the fire box is about 5 feet square.
*This post may contain affiliate links which cost you nothing, but we may earn a commission if you click the link and make a purchase.